Have: the trestle with the cartoon, the woven cotton strip, several colours of "Mattgarn" quality wool (see: Artifilum, links page), and the bobbins ready. Your wool must be wound tightly on thebobbin. Use the same gauge for the whole piece to facilitate the regularity.
weaving step by step
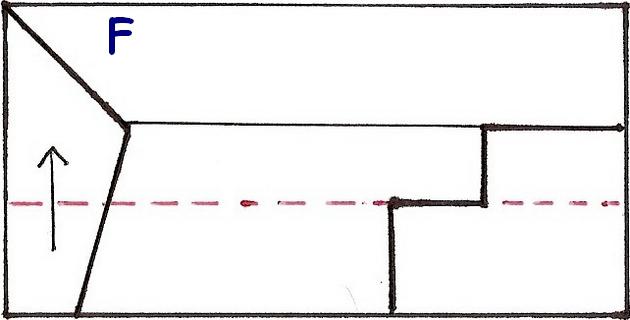
You must weave the areas from A to P one after the other rom bottom to top.
It will often be necessary to leave a colour in one area on standby to weave another colour in another area.
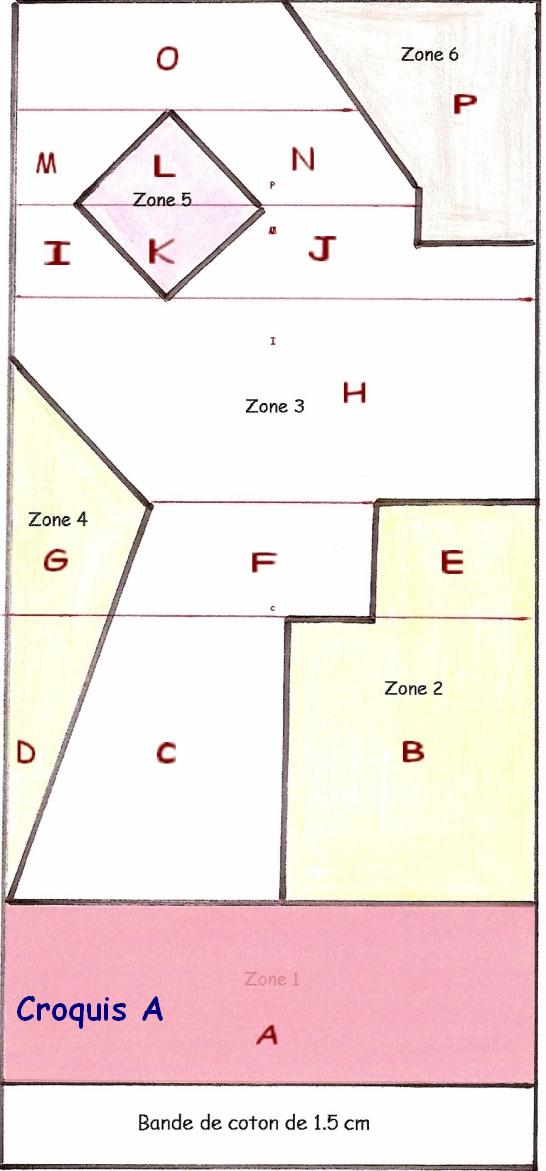
Zone A
It is not difficult. You will weave it in the same way as the cotton band. Now is the time to adjust the tension of your yarn.
From the start, it is imperative to watch the borders of your work. Weaving too tightly causes shrinkage and distorts the work
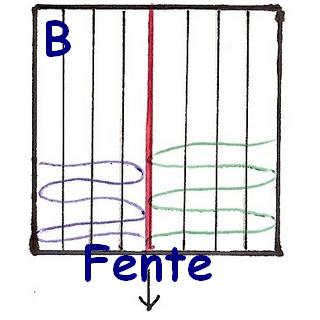
Area B. Change of colour. Your work will stop on the warp thread which is on the border of zone 2 and 3.
On this limit, you will notice when your weft goes up, the presence of a "buttonhole" This slit will stay as it is; this is the Moroccan kilim technique.
(sketch B)
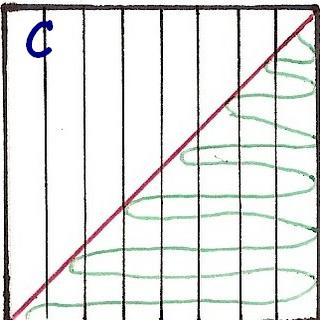
Area C
You will stop your work in section B at the red line (sketch A). When you have a colour waiting, you keep your flute and so that it does not unwind, you make a" half key "knot with your thread.
Change of colour and bobbin. On the left side of your design you must respect the slope. When your weft arrives at the line, you must leave the warp thread which is outside free (sketch C)
For the moment your work in this area stops at the red line (sketch A)
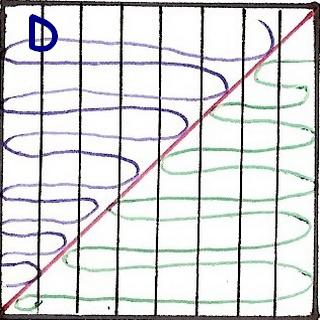
Area D
Change of colour.
You will complete this section by "meeting" the previous work in section C.
(Sketch D)
Your work will be put on stand by at the red line (sketch A)
You now have a work on stand by (sections B,C,D) in three colours on the same horizontal line.
CAUTION
Between Section C and Section D, is an important weaving learning process. It is not possible to change the order of weaving the different areas (the weft threads would slide down the unwoven warp). You can only go on weaving above an already woven área. (sketch E)
Area E
Take your stand by colour and weave this section to the border thread with area F.
You are creating a second "buttonhole".
Continue to the red line (sketch A).
Your zone 2 is finished. Leave your thread behind the warp.

Section F
Take your colour back to standby. On the right, you go to the border of section E, on the left, you respect the slope of the drawing.
Section G
Take your colour from the waiting area. First time: you go to the border of section F.
Second step, when you are in line with a horizontal line G,F,E you finish your section G respecting the slope of the drawing (sketch F)
Your zone 4 is finished.
Area H
Take your colour back to standby. This section is large. When your bobbin is empty, leave the thread behind the chain and make a second one of the same colour to continue.
On the left, you go to meet the G section.
On the right, make sure you make a straight edge.
Work your way to the bottom of the diamond.
Area I
On the right, respect the slope of the diamond, on the left you are on the border of your work. When you are at the left point of the diamond (red line in sketch A) leave your bobbin on stand by.
Area J
You have to make another bobbin of the same colour. On the left, respect the slope of the diamond, on the right respect the drawing of the area P. When you are at the right point of the diamond (red line in sketch A) leave your bobbin on stand by.
Area k-L
You can now fill in the whole lower part of the diamond (k) by going to the meeting point of areasI and J. When you reach the two side points you will weave the area L by respecting the slope of the drawing. Your area 5 is finished.
Section M et N
You take the two bobins of the same colour that were left on stand by. You assemble your work up to the upper point of the diamond (red line in sketch A). For the N area you respect the slope of the P area.
Section O
You can lower one of the two bobbins and assemble the section to its end. Your area 3 is finished.
Section P
You can fill the whole area, your work is finished.
CAUTION
When working in zone O, you may notice a problem with the warp opening. You are then in a "tapestry weft error". This situation is an essential part of the work and it is essential to master it.
Go to the page "the tapestry weft error" of the course to learn how to solve this problem.
However, if you still have problems, contact me ! You can do an training course in my workshop !